Publishing PWAs to Major App Stores: The Whys and Hows
Starting with Google Play Store, one after another app marketplace jumped on the bandwagon of welcoming Progressive Web Apps (What is Progressive Web App?) into their store, making it the new go-to approach for software delivery. With all this in play, it would be a waste not to take advantage of this newfound technology to better expand the reach of your app.
To give you a clearer perspective on the whole Progressive Web App movement, specifically the publication process, today we’ll be reviewing the current state of PWAs in major app marketplaces as well as how to publish a PWA to said stores.
Why should you publish your Progressive Web App to major app stores?
It used to be that Progressive Web Apps were limited to web installations (Add to Home Screen) only. However, with time, app marketplaces such as Google and Microsoft started recognizing the potential of PWAs and made initiatives to move foward adoptions of this technology of the future.
If you have the capabilities and funds, our professional opinion is that you should go for it—make your PWA omni-platform. After all, big brands such as Twitter, Uber and Spotify have all jumped on the bandwagon and were met with stellar results, proving this technology indeed isn’t all marketing and worth considering over. Microsoft themselves even went one step further by planning to make Progressive Web Apps the primary experience in Windows.
Recommended reading: 40+ Best Examples of Progressive Web Apps.
How to publish your PWA to major app stores
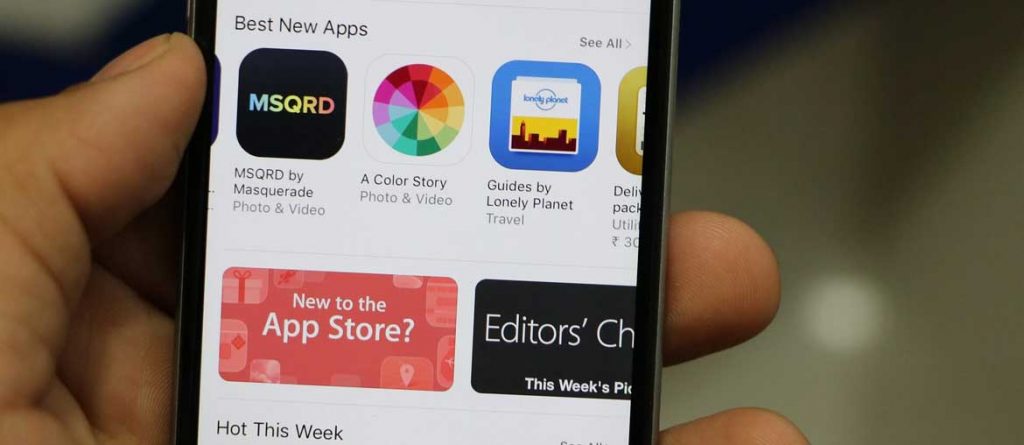
Google Play Store
Being the forerunner of the PWA movement, it wouldn’t be surprising to see Google Play Store holding open arms for Progressive Web Apps. With TWA (Trusted Web Activities) in-place, the whole publishing sequences has been made much easier and should be over in no time.
Requirements
- Android Studio installed
- A Google Developer account
- A working and quality-checked Progressive Web Apps.
Step 1: Make a clone of the TWA Starter Android App and modify
- Clone the
svgomg-twaproject with the following command:
git clone https://github.com/GoogleChromeLabs/svgomg-twa.git
- Import the project into Android Studio using File > New > Import Project.
In /app/build.gradle, modify twaManifest to your purpose. The specifics as to the what and how to change can be found within the build.gradle file.
Note: The applicationId should follow a format of <com>.<your-brand>.<your-app>
After modifications, your /app/build.gradle should look something like this:
def twaManifest = [
applicationId: 'com.simicart.app',
hostName: 'simicart.com', // The domain being opened in the TWA.
launchUrl: '/', // The start path for the TWA. Must be relative to the domain.
name: 'SimiCart PWA', // The name shown on the Android Launcher.
themeColor: '#ED8A19', // The color used for the status bar.
navigationColor: '#303F9F', // The color used for the navigation bar.
backgroundColor: '#bababa', // The color used for the splash screen background.
enableNotifications: false, // Set to true to enable notification delegation.
// Add shortcuts for your app here. Every shortcut must include the following fields:
// - name: String that will show up in the shortcut.
// - short_name: Shorter string used if |name| is too long.
// - url: Absolute path of the URL to launch the app with (e.g '/create').
// - icon: Name of the resource in the drawable folder to use as an icon.
shortcuts: [
name: 'Open SimiCart',
short_name: 'Open',
url: '/open',
icon: 'splash'
]
,
// The duration of fade out animation in milliseconds to be played when removing splash screen.
splashScreenFadeOutDuration: 300
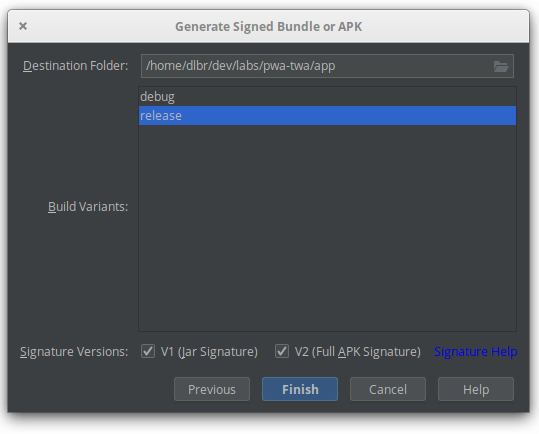
]Step 2: Create a key store and verify APK
Key stores or upload keys are necessary for verification of your APK. To create a key store, launch Android Studio and navigate to Build → Generate Signed Bundle/APK and fill in the required fields.

Once you have created a Key Store, you’ll need to extract the SHA256 fingerprint from it using the following commands:
keytool -list -v -keystore ~/dlbr-keystore.jks -alias twa -storepass •••••• -keypass ••••••
Entry type: PrivateKeyEntry
...
Certificate fingerprints:
         SHA1: ...
         SHA256: 2A:9B:A8:64:32:0A:69:99...: ? copy this line
Step 3: Configure the Digital Asset Link
A Digital Asset Link is needed for ownership verification of your web content which can later be used to link to your APK.
Generate a statement file
Use the SHA256 fingerprint that you extracted earlier and generate a statement file with the Statement List Generator and Tester.
Once you have generated a statement file, the next step is to create a publicly accessible file that contains information from the Digital Asset Tool. The file should be placed in your web host and in this location:
.well-known/assetlinks.json
The location of this file is dependant on the build process of your web app, but normally it should be on the deployed directories, namely the ‘public’ or ‘dist’ directories.
When all is done, the next and final step for you to do is to deploy your app.
Step 4: Build and release your app on Google Play
With your Google Play Console at default settings, go to All Applications → Create Application.
Create an Internal Test
Navigate to App releases → Internal Test Track → Create release to create an Internal Test Track of your app.
Build a Signed APK
In Android Studio, navigate to Build → Generate Signed Bundle/APK and use the SHA256 key store that we extracted earlier. Do make sure that you check both the signature version boxes.
Upload the APK
You’re now at the end of this process. To upload your apk, simply go to Google Play Store, App Releases → Internal Test Track → Edit Release.
Don’t forget to complete the Store Listing
All required fields must be filled out before your app can be listed for the review process. These fields are needed for crucial information such as pricing details, store listing, content rating, etc. When this process is completed, you should see four green checkmarks ✔️ indicating that all required fields are filled in.
And that’s it. Your PWA is now ready for review and will be ready for public download in a few hours.
Apple App Store
Of all the major app marketplaces, Apple App Store might just be the one that’s the least bit welcoming or even hostile to PWAs, which is kind of ironic considering Steve Jobs was the first one to vision a future full of Progressive Web Apps.
The full Safari engine is inside of iPhone. And so, you can write amazing Web 2.0 and Ajax apps that look exactly and behave exactly like apps on the iPhone. And these apps can integrate perfectly with iPhone services. They can make a call, they can send an email, they can look up a location on Google Maps.
Steve Jobs, 2007
In iOS, PWAs are severely limited in terms of features. There’s no support for push notifications, web app manifest is only partially supported, and new features such as New App Gallery often ignore PWAs altogether. And because of this, it only makes sense that PWA is not welcome in Apple App Store, as per Apple’s App Store Review Guidelines:
Your app should include features, content, and UI that elevate it beyond a repackaged website. If your app is not particularly useful, unique, or “app-like,” it doesn’t belong on the App Store.
Minimum Functionality, App Store Review Guidelines
Since Apple tries their hardest to cripple all the capabilities of PWA, any effort to publish a PWA—even when with a native app wrapper like Cordova—is futile. For now, we can only hope that future iOS versions will bring better support for PWA, but as of now, publishing PWA to Apple App Store is not possible, which is why you should consider a native app approach instead if most of your target audience uses iOS-based devices.
Read more: PWAs on iOS 14 Beta: Subtle Changes
Microsoft Store
As stated in our Windows 10 and PWA: The future of Software Delivery article, Microsoft has been laying out the groundworks for a Progressive Web App store for quite a while and it’s step by step becoming a reality. PWAs from more popular brands are already populating all over the app marketplaces and with no less of exemplary results for others to follow.
Like Google, Microsoft welcomes PWAs and furthermore—they even plan to popularize and replace native, UWP apps with hybrid apps – a kind of Progressive Web Apps wrapped in native shells.
In theory, publishing your Progressive Web App to Microsoft Store shouldn’t take you any effort at all since it was originally planned to be an automatic process that uses Bing as a crawling mechanism for quality PWAs. However, the whole thing is still in an experimental stage and doesn’t work quite as effectively as planned, which is why you would need to manually submit your PWA as a Windows app package (.appx). But don’t worry, the process isn’t as nerve-wracking as a certain app store.
Requirements
- A Windows Dev Center account
- PWABuilder
- A working and quality-checked Progressive Web App that meets the store policies
Step 1: Reserve a name for your app
The first step in publishing an app in Microsoft Store is reserving a name. In case you’re wondering what would happen if one mad lad decided to reserve every name in existence: don’t worry, the name reservation will expire after 3 months.

Fill in the required fields and note them somewhere as this information will be required later.
Step 2: Generate an AppX using PWABuilder
As mentioned above, PWABuilder is a great way to generate a functional package publishable on major app marketplaces. It’s one of the first tools on the market that was developed by Microsoft solely for the purpose of moving PWA adoption forward.
Generate Manifest

On PWABuilder, enter the URL of your PWA and click on Get started. Do note that this step is crucial as it automatically identifies and/or fills in the missing information in your manifest.json, which is often needed for PWAs that are not specifically built for Microsoft Store.
Recommended reading: PWA Manifest: Creating your web app manifest the easy way
The next step is building service workers for your PWA, but assuming that yours is a typical Progressive Web App in which service workers are already integrated, this step will be skipped and we will move forward to the final step—obtaining your .appx package.
Generate AppX
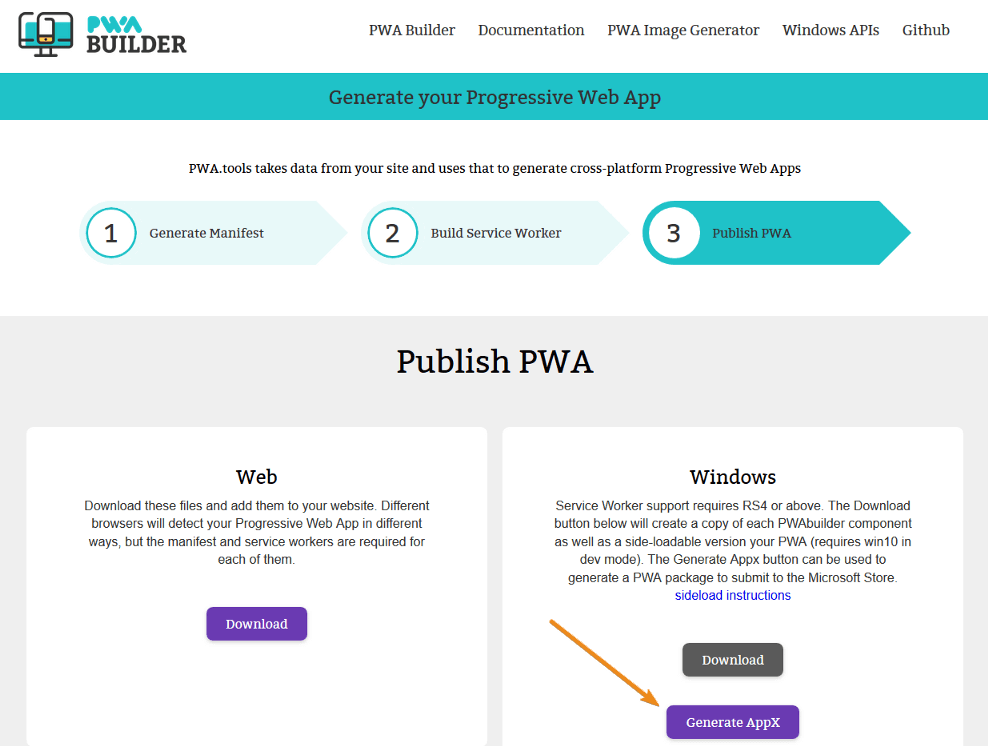
Upon clicking generate AppX, you should see something like this pop-up:
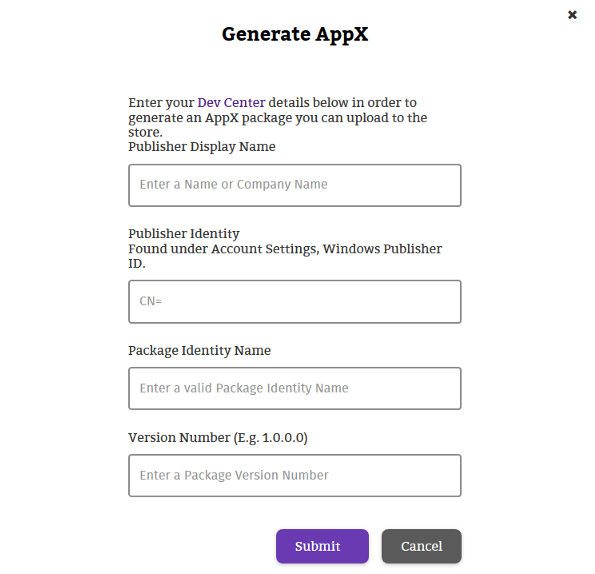
This is where the earlier information can come in handy. Fill out the fields and a download box containing the .appx package will be shown. Download it and you will now be ready for publishing your PWA to Microsoft Store.
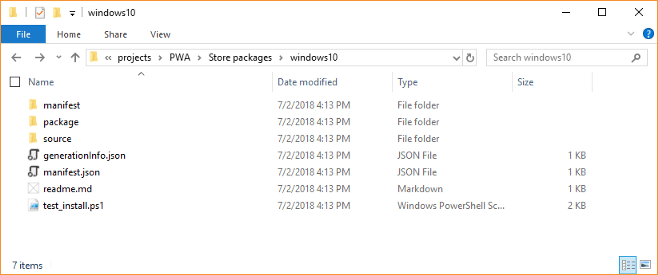
In case you want to test your PWA before publishing it on the store, there’s always the option to Windows-test it by enabling Developer Mode → Right-click on test_install.ps1 → Run with PowerShell. Doing this will automatically add your PWA to your desktop and Start menu, from which it can be launched and tested to see if everything’s working properly.
Step 3: Submit your app package to Microsoft Store
To publish your PWA to Microsoft Store, you’ll need to navigate to the package folder inside the .zip that you downloaded earlier. In this folder is everything that you would need to publish to Microsoft Store. For clarifications, this folder doesn’t contain any of your code as it only serves as a directing mechanism to your PWA on the web and other unrelated Store metadata.
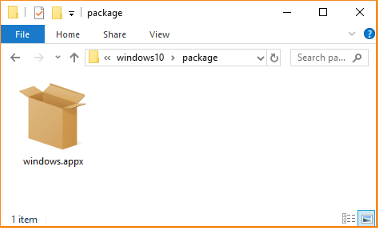
Once you have located the windows.appx, head over to the submission page in your Dev Center and fill in the required information:
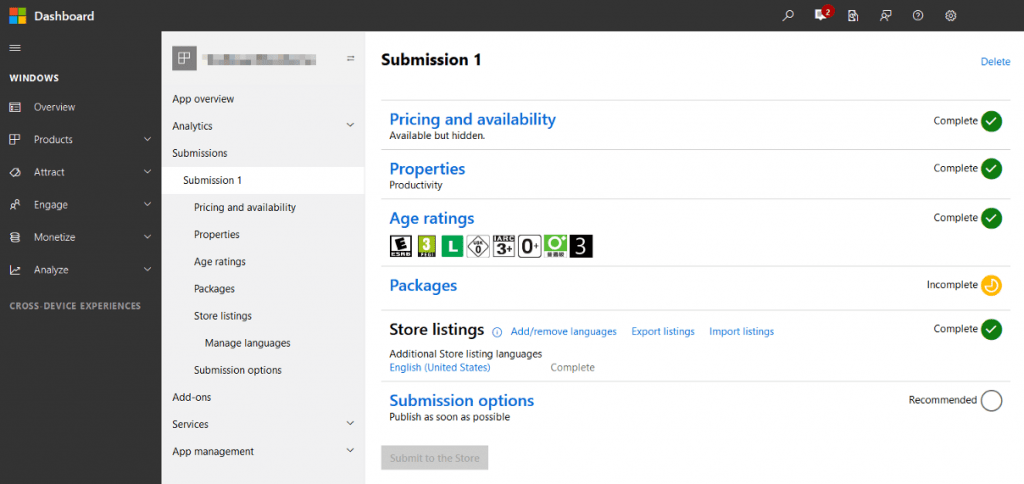
windows.appxAfter completing all the steps and filling in all the required fields, the “Submit to the Store” button should light up, indicating that your PWA is now ready for the review process. It will take an hour to several days for this process to complete; once it’s over your PWA will be certified and available to public/private downloads (depends on your availability settings in Dev Center).
Conclusion
After all this, perhaps you’re still wondering why should you even build a Progressive Web App—much less go through all this trouble to publish one. And you’re right to ask such fundamental questions.
Progressive Web App is step by step proving itself to be the future of software delivery and the next natural step in the Evolution of Web Techonology. As of now, it’s already widely used everywhere in the eCommerce world where unified and engaging experience across all devices is the key to high conversions.