Table of contents
In our article today, we’ll learn about form validation in Magento 2, and how you can best implement form validation into your Magento store.
Form validation modules
In Magento, there are three main modules for form validation that are based on and extend jQuery validation.
/lib/web/jquery/jquery.validate.js: the base jQuery validation/lib/web/mage/validation.js: includes the base jQuery validation and addition functions such as the$.validator.addMethodwhich can be used to add custom validation rules/lib/web/mage/validation/validation.js: includesmage/validation.jsand adds a few more rules to the validator
Form validation rules
By default, available rules in Magento are stored in /validation/rules.js. However, that’s not all the rules you can use. As the main modules for form validation are based on jQuery, you can use jQuery’s built-in validation methods.
How-tos
Create custom rules
As mentioned above, you can create custom rules by creating a JavaScript mixin for the mage/validation module and calling the $.validator.addMethod, like so:
$.validator.addMethod(
  'rule-name',
  function(value, element) {
    // Return true or false after validation rule check
  },
  $.mage.__('Error message to display if validation fails')
)
And the following code will add a validation rule to the mixin to check if an input field has only five words.
Vendor/Module/view/frontend/requirejs-config.js
var config = {
  config: {
    mixins: {
      'mage/validation': {
        'Vendor_Module/js/validation-mixin': true
      }
    }
  }
}
Vendor/Module/view/frontend/web/js/validation-mixin.js
define(['jquery'], function($) {
  'use strict';

  return function() {
    $.validator.addMethod(
      'validate-five-words',
      function(value, element) {
        return value.split(' ').length == 5;
      },
      $.mage.__('Please enter exactly five words')
    )
  }
});
Modify an existing validation message
The messages object might come in handy when you need to only modify an existing validation message without changing the validation rule.
For example, in the code below:
$('#form-to-validate').mage('validation', {
    messages: {
        'input-name': {
            'validation-rule-1': 'Validation message 1',
            'validation-rule-2': 'Validation message 2',
        },
    }
});
input-name is the key of the object, and its value is a list of validation rules. These validation rules have validation messages as their value, which you can freely modify to your liking.
Create custom form validations
With the mage/validation library, you can create custom form validations before submitting them to the server.
Step 1: Initiate validations
There are two ways you can use to initiate form validation:
Using the data-mage-init attribute
<form id="my-form" data-mage-init='{"validation": {}}'>
    ...
</form>
Using the text/x-magento-init script type tag
<script type="text/x-magento-init">
    {
        "#my-form": {
            "validation": {}
        }
    }
</script>
Step 2: Define validation rules for a form field
There are various ways you can define form validation rules in Magento
As an attribute
<input id="field-1" ... required="true"/>
As an attribute with arguments
<input id="field-1" ... required="true" minlength="15"/>
As a class name
<input id="field-1" ... class="input-text required-entry"/>
As a class name with arguments
<input id="field-1" ... class="input-text required-entry" minlength="15"/>
As a data-validate attribute:
<input id="field-1" ... data-validate='{"required":true}'/>As a data-validate attribute with arguments
<input id="field-1" ... data-validate='{"required":true, "minlength":10}'/>Using data-mage-init
<form ... data-mage-init='{"validation": {"rules": {"field-1": {"required":true}}}}'>
    ...
</form>
Using data-mage-init with arguments
<form ... data-mage-init='{"validation": {"rules": {"field-1": {"required":true, "minlength":20}}}}'>
    ...
</form>
Examples
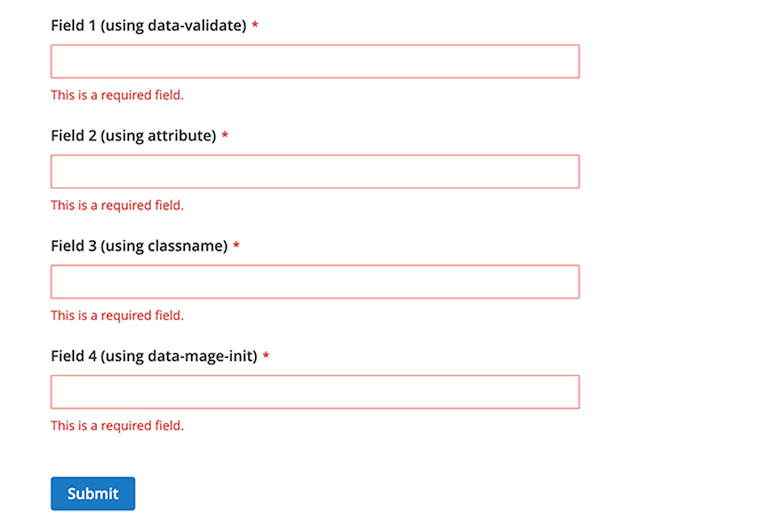
Here we’ll try to create form fields, along with validation forms for each field using different validation methods.
<form class="form" id="my-form" method="post" data-mage-init='{"validation":{"rules": {"field-4": {"required":true}}}}'>
    <fieldset class="fieldset">
        <div class="field name required">
            <label class="label" for="field-1"><span>Field 1 (using data-validate)</span></label>
            <div class="control">
                <input name="field-1" id="field-1" title="Field 1" value=""  class="input-text" type="text" data-validate='{"required":true, "url": true}'/>
            </div>
        </div>
        <div class="field name required">
            <label class="label" for="field-2"><span>Field 2 (using attribute)</span></label>
            <div class="control">
                <input name="field-2" id="field-2" title="Field 2" value="" class="input-text" type="text" required="true"/>
            </div>
        </div>
        <div class="field name required">
            <label class="label" for="field-3"><span>Field 3 (using classname)</span></label>
            <div class="control">
                <input name="field-3" id="field-3" title="Field 3" value="" type="text" class="input-text required-entry"/>
            </div>
        </div>
        <div class="field name required">
            <label class="label" for="field-4"><span>Field 4 (using data-mage-init)</span></label>
            <div class="control">
                <input name="field-4" id="field-4" title="Field 4" value="" class="input-text" type="text"/>
            </div>
        </div>
    </fieldset>
    <div class="actions-toolbar">
        <div class="primary">
            <button type="submit" title="Submit" class="action submit primary">
                <span>Submit</span>
            </button>
        </div>
    </div>
</form>
Using the above fields and form validations, your result should look something like this: