
Table of contents
With just one single instance of the Magento software, you can have multiple websites, stores, and storeviews operating on the same Magento backend. This in turn allows for limitless flexibility for your eCommerce operations, but the process of setting up a store with multiple stores and domains can be tricky to get right—and our article today will be able to help you with this.
First, let’s take a look at an overview of the multisite scope, and we’ll process from here.

Source: Magento
Step 1: Create websites
At the top level of your multistore scope is websites. A new website is required when you want to create a separate site that does not share cart information, shipping methods, payment methods, etc with the default website.
To create a new website:
- In your Magento backend, go to Stores > Settings > All Stores.
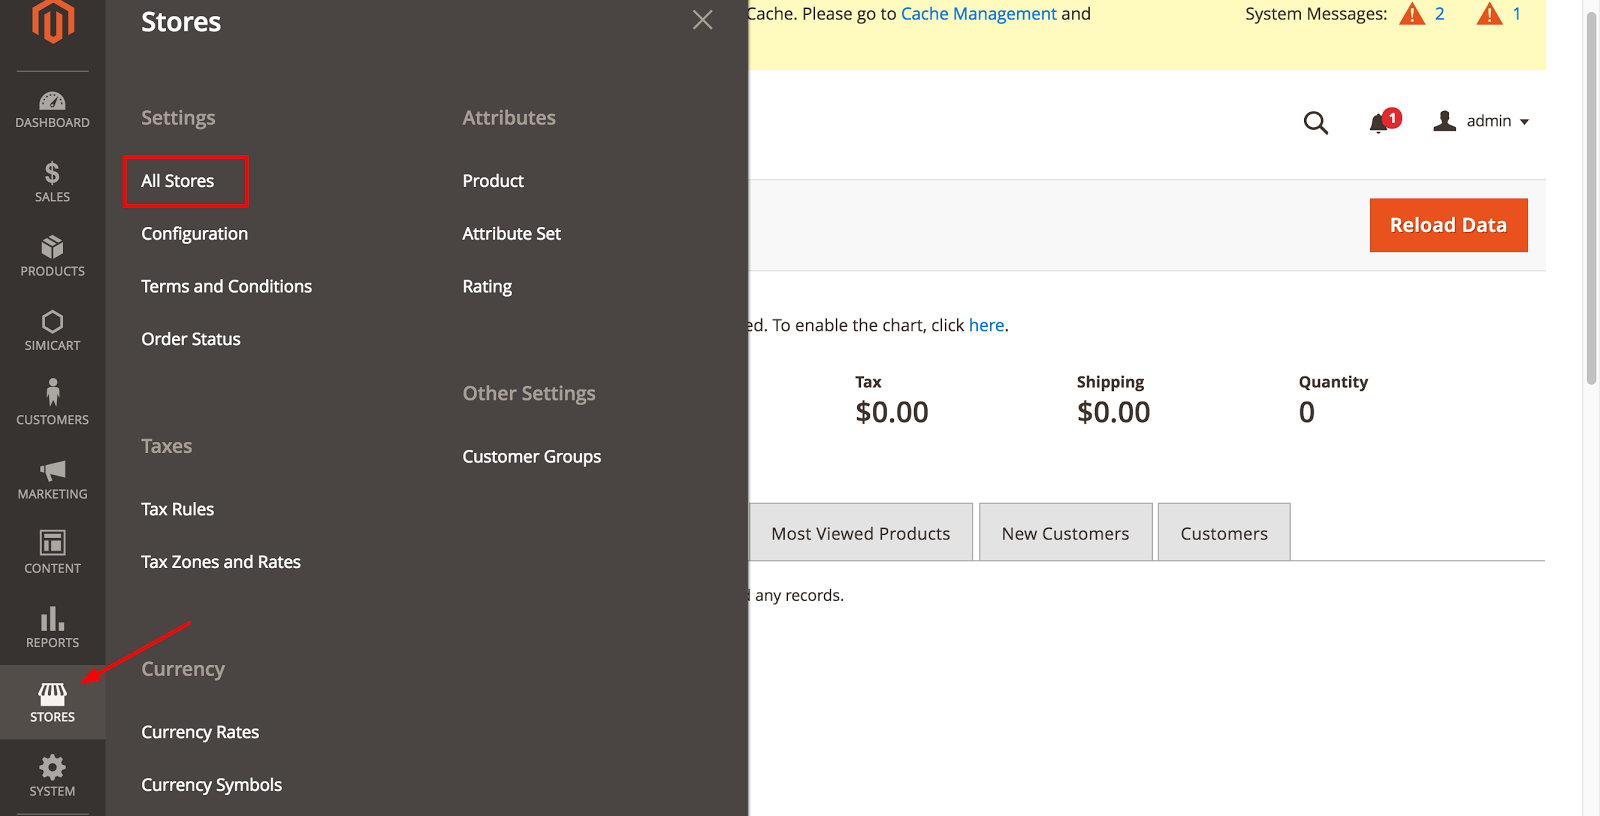
- On the Stores page, click Create Website.

- Name: Enter a name to identify the website.
- Code: Enter a unique code; for example, if you have a French store, you can enter
french - Sort Order: Enter an optional numerical sort order.
- Click Save Web Site.
- Repeat these tasks as many times as necessary to create your websites.
Step 2: Create stores
Managed by your websites are stores. With multiple stores, you use the same product catalog to present different selections of products and categories. A store can have multiple storeviews.
To create a new store:
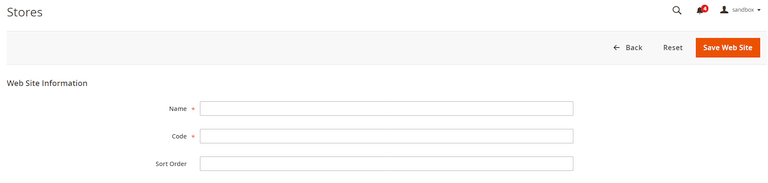
- In your Magento backend, go to Stores > Settings > All Stores.
- On the Stores page, click Create Store.

- Web Site: Select the website with which to associate this store.
- Name: Enter a name to identify the store.
- Root Category: Select the root category for this store.On the Stores page, click Create Store.
- Click Save Store.
- Repeat these tasks as many times as necessary to create your stores.

Step 3: Create store views
Managed by stores are storeviews—the selectable views that customers can choose to enable different languages, catalog prices, and/or different currencies.
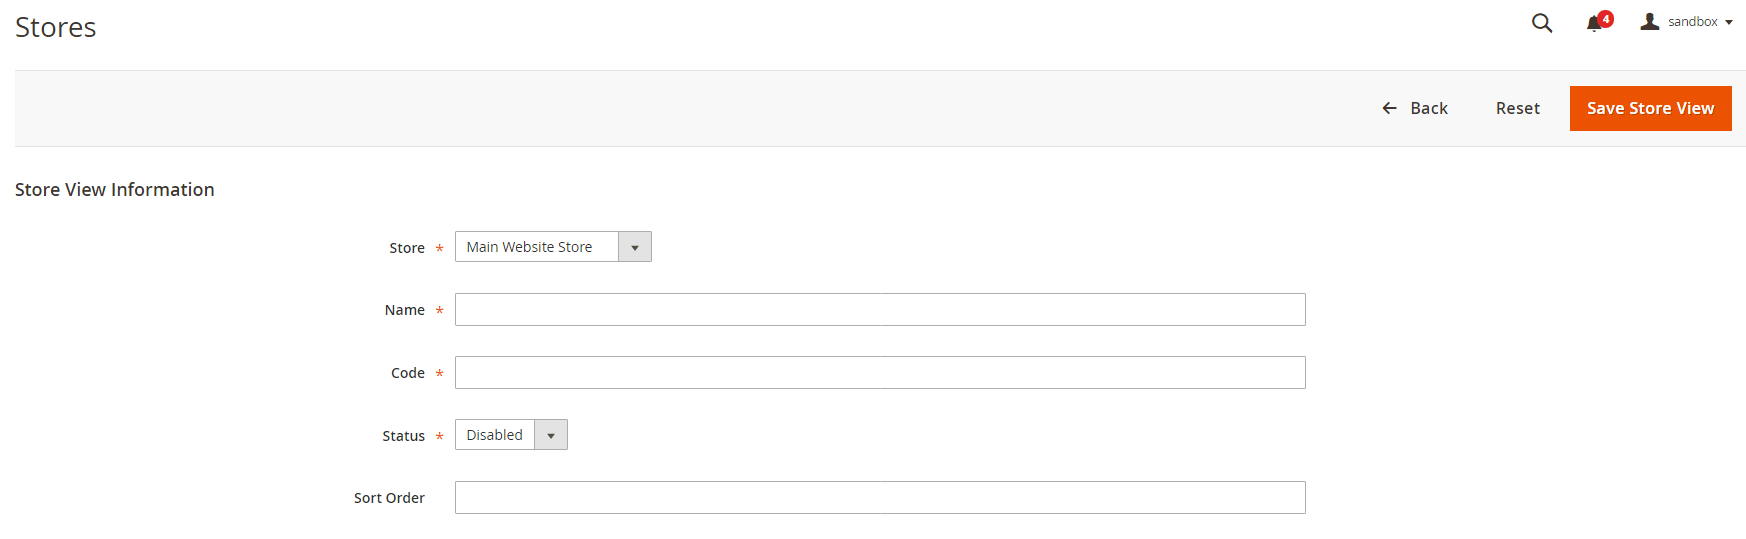
- In your Magento backend, go to Stores > Settings > All Stores.
- On the Stores page, click Create Store View.

- Store: Select the store with which to associate this store view.
- Name: Enter a name to identify this store view.
- Code: Enter a unique name to identify this store view.
- Status: Select Enabled.
- Sort Order: Enter an optional numerical sort order.
- Click Save Store View.
- Repeat these tasks as many times as necessary to create your store views.
Magento 2 Multiple Store View Pricing
$249,00 $299,00
Step 4: Change the website’s base URL
- In your Magento backend, go to Stores > Settings > Configuration. Under General section, click Web.
- From the Store View list at the top of the page, select a website.
- Expand Base URLs section.
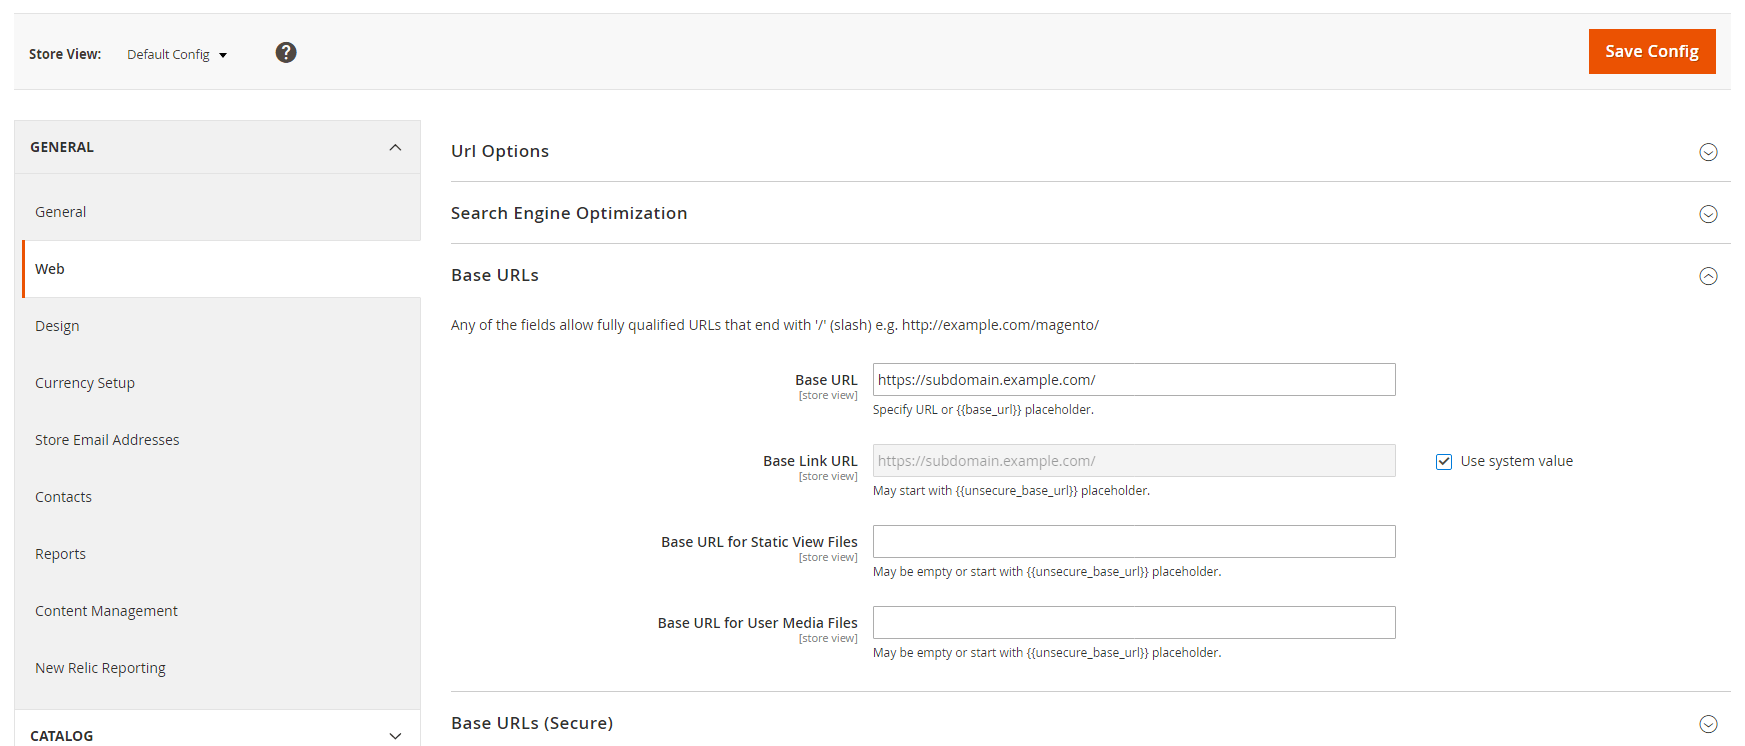
- Enter this website’s URL. For example: https://subdomain.example.com/
- Click Save Config.
- Repeat these tasks for other websites.
Step 5: Add the store code to the base URL
Magento gives you the option to add the store code to the site’s base URL, which simplifies the process of setting up multiple stores. Using this option, you don’t have to create directories on the Magento file system to store index.php and .htaccess.
This prevents index.php and .htaccess from getting out of sync with the Magento codebase in future upgrades.
- In your Magento backend, go to Stores > Settings > Configuration. Under General section, click Web.
- From the Store View list at the top of the page, select Default Config.
- Expand Url Options section.
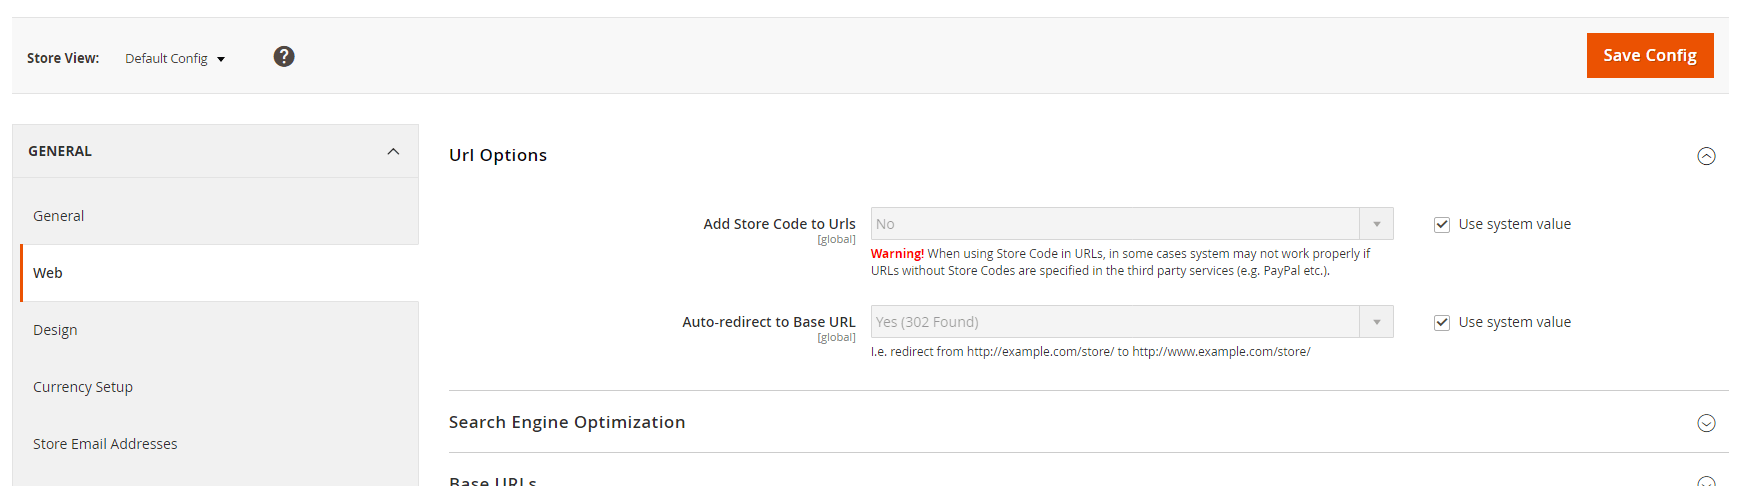
- Uncheck the Use system value box next to Add Store Code to Urls. Then set this to Yes.
- Click Save Config.
- If prompted, flush the Magento cache. (System > Cache Management).
Step 6: Change the default store view’s base URL
- In your Magento backend, go to Stores > Settings > Configuration. Under General section, click Web.
- From the Store View list at the top of the page, select Default Config.
- Expand Base URLs section.
- Enter your website’s base URL. For example: https://www.example.com/
- Click Save Config.
After this step, you’ll lose access to your Magento Admin. But don’t worry, your Magento Admin will be accessible after completing the next step which is configuring virtual hosts.
Step 7: Server-side configurations
To finish setting up multiple stores and domains for your Magento website, you’ll need to make some changes to your web server configuration. In short, you’ll need to:
- Create a new virtual host for each new website
- Pass the values of
MAGE_RUN_TYPEandMAGE_RUN_CODEto the new configurations - (Optional) Set static routes to the host
The process of creating a new virtual host for your new websites might vary based on what type of server you’re running. For example, with Apache 2.4 and above, the process involves editing your /etc/httpd/conf/httpd.conf like so:
<VirtualHost *:80>
   ServerName          mysite.mg
   DocumentRoot        /var/www/html/magento2/pub/
</VirtualHost>

<VirtualHost *:80>
   ServerName          french.mysite.mg
   DocumentRoot        /var/www/html/magento2/pub/
   SetEnv MAGE_RUN_CODE "french"
   SetEnv MAGE_RUN_TYPE "website"
</VirtualHost>

<VirtualHost *:80>
   ServerName          german.mysite.mg
   DocumentRoot        /var/www/html/magento2/pub/
   SetEnv MAGE_RUN_CODE "german"
   SetEnv MAGE_RUN_TYPE "website"
</VirtualHost>
ServerName: is the new domain for your new websiteDocumentRoot: where Magento is served. It’s recommended that you should setDocumentRootto Magento/pub/directory for security purposesSetEnv MAGE_RUN_TYPE: set to either website or store, depending on ifServerNameis a new website or a new store scopeSetEnv MAGE_RUN_CODE: set to the unique website or storeview code that corresponds toMAGE_RUN_TYPE
After you’re finished configuring, restart your web server by executing:
- CentOS:
service httpd restart - Ubuntu:
service apache2 restart
(Optional) Set static route(s) to the host
In case you don’t have DNS set up for your store’s URLs, you’ll need to set up static routes in your hosts file with the following format:
<ip address> <new website>
For example:
192.168.1.15 simicart-store.com
192.168.1.16 french.simicart-store.com
192.168.1.17 german.simicart-store.com
Notes: Set your Magento domains with distinct IP addresses if you want a separate checkout process
And it’s done! Now go to the URLs that you have set up for your new store/website and see if everything works properly.
Related post: How to Add and Configure Multi Language for your Magento Store


