
Table of contents
The Magento platform has opened a great opportunity for business owners to launch their stores with fewer limitations and greater flexibility. There might be thousands of products under many categories and sub-categories in a store, and usually, the time customers spend searching for the products tends to be brief. Therefore, your Magento store may face a decline in conversions if you cannot provide customers with an easy search experience and useful real-time search results. That’s the reason why you need a powerful search engine, and Magento 2 Elasticsearch comes to the rescue.
What is Elasticsearch in Magento 2?
According to Elasticsearch B.V., Elasticsearch is a distributed, free, and open search and analytics engine for all types of data, including textual, numerical, geospatial, structured, and unstructured.
First released in 2010, Elasticsearch is built on a Java-based search and indexing library called Apache Lucene. It is a full-text search engine that suggests related keywords and shows complete queries by comparing words within the document or database. Also, its distributed model and openness to all types of data make it fast to search and easy to scale.
Because of these abilities, Elasticsearch has been used in Application search; Website search; Enterprise search; Logging and log analytics; Application performance monitoring; Geospatial data analysis and visualization; Business Analytics, etc.
Since Magento 2.4, Adobe Commerce or Magento requires Elasticsearch to be the default catalog search engine. Therefore, it becomes a compulsory component, and cannot be disabled when installing Magento. Elasticsearch gives customers faster and more relevant search results in real time, which increases the business conversion rate. This is a huge benefit for both customers and Magento 2 store owners.
How does Elasticsearch work?
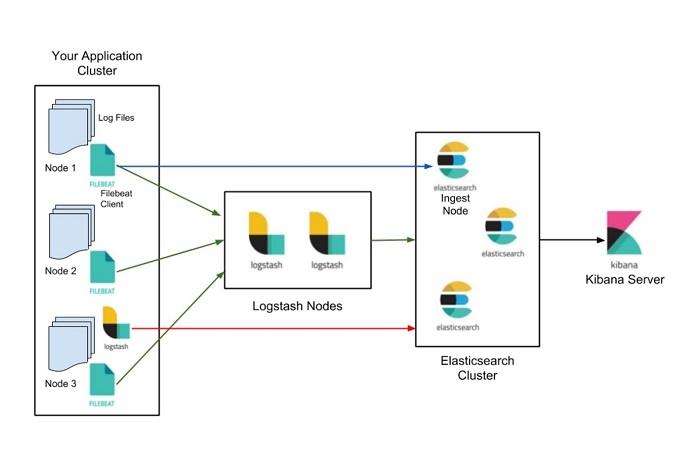
What enables Elasticsearch to give out such quick and reliable search results is its indexing ability, in which it looks for indices rather than examining the text. An elastic index is a group of similarly structured documents that allows for quick and efficient data retrieval and is used to store logically related documents.
When raw data flows into Elasticsearch from various sources, such as logs, system metrics, and web applications, Elasticsearch processes it. Then it indexes this data, and after that, users may execute complicated searches on the data and receive detailed summaries of their data using aggregations. (Elastic.co)
Some of Elasticsearch’s significant features:
- Quick text search
- Search suggestions
- Auto-completion
- Spelling/Mistyping checking & stopwords detection
- Logging and Analysis
- Geo-location Search
Benefits of Magento 2 Elasticsearch
Great searching experience
Slow response times and poor functionality of search engines can lead to high bounce rates. With Elasticsearch’s fast result generation and real-time relevant outcomes, customers won’t be discouraged and leave the site.
And thanks to auto-completion and auto-suggestion, customers can save a lot of time and effort as well as reduce incorrect queries.
Also, one irritating thing searchers usually face is typos or misspellings. This leads to search engines not being able to recognize the keywords and giving out a “no results found” status. Elasticsearch can find stop words and the phrases that match them, so it can still give related results and even make them more accurate.
Quick search
Elasticsearch is a powerful tool that can retrieve the searched keywords in under 10 seconds, much faster than the typical SQL-based search. As it is built on top of Lucene and uses distributed inverted indices, Elasticsearch performs exceptionally well at full-text search. ElasticSearch can catch all the search queries for the result set, so that every time a search query contains a cached filter, it will direct the search for the result from the cache. This means the time between when a document gets indexed and when it becomes searchable is relatively brief, thereby increasing the search result response.
High scalability and huge volumes of data management
Elasticsearch is based on a distributed architecture. The company states that “the documents stored in Elasticsearch are distributed across different containers known as shards, which are duplicated to provide redundant copies of the data in case of hardware failure.” Therefore, its nature allows for scaling up to thousands of servers and managing enormous volumes of data.
Moreover, it is built in a way that it can proceed successfully on any cluster or system with numerous nodes. As a result, expanding from a single small cluster to a larger one only requires little preparation and is practically seamless.
Schema-free
Elasticsearch uses JSON, which is JavaScript Object Notation. It stores JSON documents with indexing data to detect data structure and makes them searchable. It means that it does not require any kind of data definition and normally uses defaults to index the data, unless a specific data type is given. When an object with a new property is indexed later, the mapping definitions are automatically updated. Therefore, it’s schema-free.
Prerequisites to set up Elasticsearch
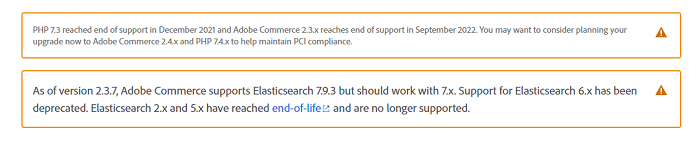
As a required add-on to the Magento platform, Elasticsearch must be installed and configured before users upgrade to version 2.4.x. Also, users should be aware that Adobe no longer supports Adobe Commerce 2.3.x and PHP 7.3. So it is recommended to upgrade to Adobe Commerce 2.4.x and PHP 7.4.x to preserve PCI compliance.
The current Magento 2.4.x installation sequence requires users to install Elasticsearch along with these additional requirements:
- Webserver (Apache or Nginx)
- MySQL
- PHP
The version that Magento requests for all installations is Elasticsearch 7.6.x, so users should make sure they opt for this version. Some current third-party Magento 2 Elasticsearch extensions can help you integrate Elasticsearch into your Magento stores.
Easy Elasticsearch configuration for your Magento store
Here we guide you through the steps to configure Elasticsearch using the Magento 2 Admin Panel.
Step 1: Configuring Magento 2 Elasticsearch Search Options
1. Log in to your Magento 2 Admin Panel as an admin.
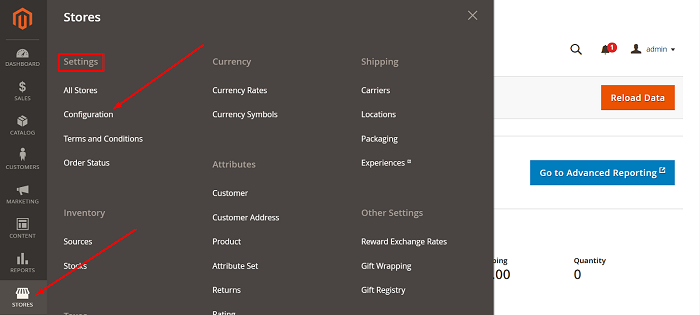
2. Clicks Stores. At Settings, choose Configuration. From this page, click on the Catalog section to expand it.
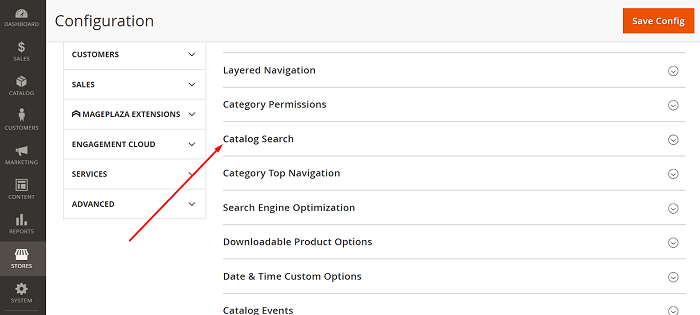
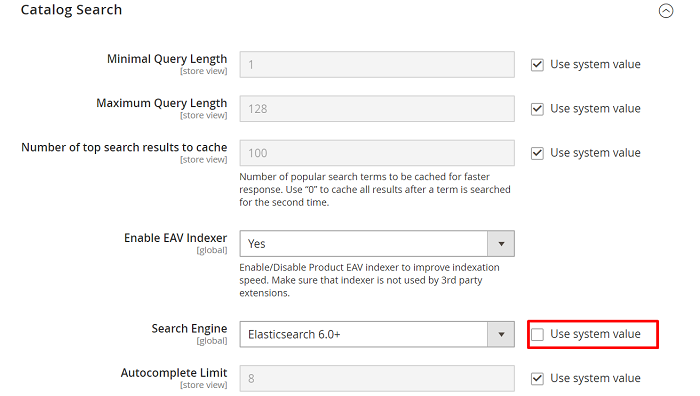
3. Choose Catalog Search. Here you see all the Search Engine versions to select and other general settings.
- Minimum Query Length: the minimum number of characters that users must enter before Elasticsearch recommendations or suggestions show up. And the system default value is 3.
- Maximum Query Length: the maximum number of characters to type to see results. The system default value is 128.
- Number of top search results to the cache: here you enter the limiting number of popular search results to enhance response speed. The default value is 100. The second time a term is searched, submit a “0” to cache all the results.
- Enable or disable EAV Indexer: modify this field to increase indexation speed and avoid third-party extensions using the indexer.
- Autocomplete Limit: you set the value to limit the maximum search results displayed for Magento 2 Elasticsearch autocomplete. This helps improve the search performance and shorten the displayed list. The default setting is 8.
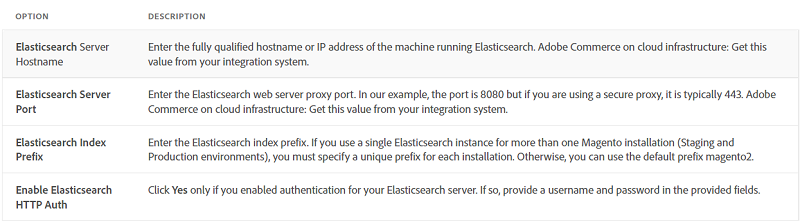
Step 2: Configuring Magento 2 Elasticsearch Connection
The following table shows the required options to configure and test the connection with Magento. If you don’t adjust any settings and let the defaults work, skip to the next step.
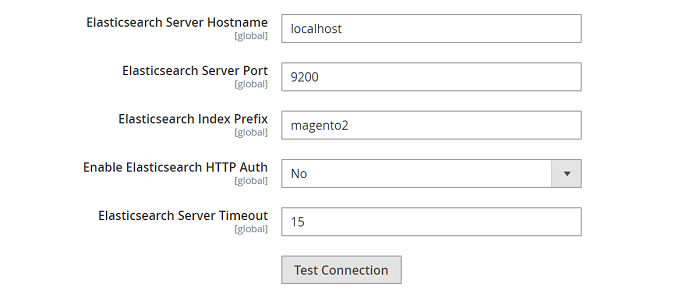
Click Test Connection to finish the setup and test.
If the connection does not succeed, try the following ways
- Check that your Elasticsearch server is still running.
- Log in to the Magento server and ping the Elasticsearch host if it is on a different host from Magento. Resolve any network connectivity problems and retest your connection.
- Address any stack traces and errors in the command window where you launched Elasticsearch before proceeding. And make sure you started Elasticsearch as a user with root access.
- Ensure the UNIX firewall and SELinux are switched off, or enable communicating between Elasticsearch and Magento by setting up rules.
- Guarantee that the port selected in the Elasticsearch Server Port field is not already in use by another process by using the
netstat -an | grep **listen-port**command.
Step 3: Configure Suggestions and Recommendations
As mentioned above, the search recommendations and suggestions of Magento 2 Elasticsearch are convenient and helpful for customers looking for suitable products.
For this stage, you can utilize the default settings or make some changes:
- Enable the Enable Search Recommendations and Enable Search Suggestions fields.
- Choose to offer how many search recommendations and suggestions in the Search Recommendations Count and Search Suggestions Count fields.
- Allow showing the number of results found for each recommendation and suggestion or not in Show Result Count for Each Recommendation and Show Result Count for Each Suggestion fields.
- Specify a value in Minimal Terms to Match to set the minimum amount of terms that the search results need to match for users to receive the most relevant ones.
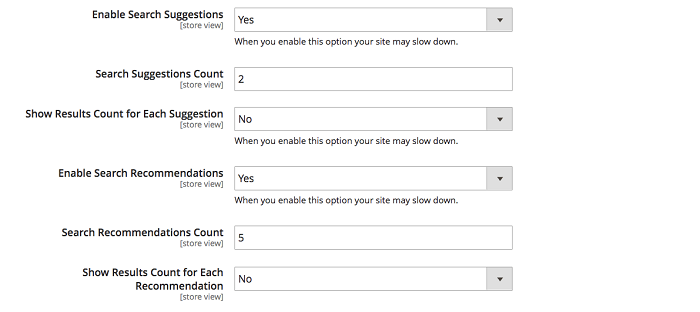
When you finish setting up, hit the Save Config.
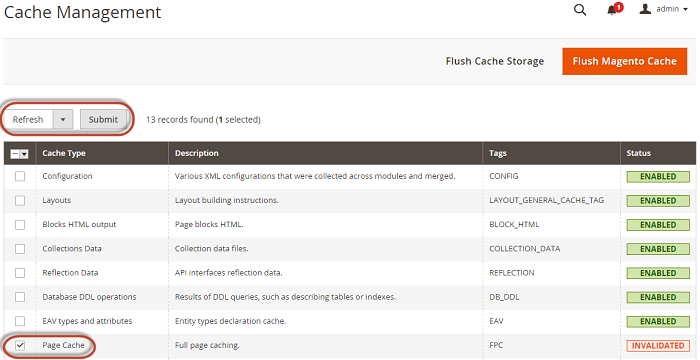
Step 4: Reindexing Catalog Search and Refreshing the Full Page Cache
After you change Magento 2 Elasticsearch configuration, you have to reindex the catalog search index and reload the complete page cache. There’re two ways to do this: using the Admin or command line.
Using the Admin Panel:
- In the Admin, click System and navigate to Cache Management.
- Tick the box of Page Cache.
- Select Refresh from the Actions list in the upper right of the page.
To clean the cache, run the magento cache:clean command.
Using the command line:
- Log in as the file system owner or switch to it on your Magento server.
- To reindex the catalog search index only, enter:
bin/magento indexer:reindex catalogsearch_fulltext
- To reindex all indexers, enter:
bin/magento indexer:reindex
- Wait for the reindexing process to complete.
Conclusion
Used by famous names like Netflix, LinkedIn, eBay, etc., Elasticsearch is trusted to make site searches easy and effective for your customers. Once the Magento 2 Elasticsearch configuration is complete, your store will be reinforced to convert searches into sales and minimize cart abandonment.
Hope this post is useful and we wish you the best of luck in e-commerce!


