Table of contents
Fundamentally, SEO for a headless CMS still follows the same rules as a traditional CMS. So crawlability, speed, and content quality remain the goals when you want to get into it. But although we have similar goals to attain, the means to achieve these goals are different in a headless CMS.
How SEO is different in a headless CMS
In a headless CMS, most of the SEO work has to be done manually, as there’s typically no plugin or add-ons to ease out the whole process—and this means more work for you, and more things to learn in the process instead of relying on third-party tools. Moreover, since most headless CMS and frontend frameworks right now are JavaScript-based, SEO for such environments can get complicated due to the nature of crawlers not being able to render JavaScript easily.
Even though Googlebot can render JavaScript, we don’t want to rely on that.
Martin Splitt, on implementing dynamic rendering
Recommended reading: Headless CMS vs Traditional CMS
Things to look out for in a headless CMS
Alt texts
Alt texts help make your image content readable by Google bots. Similar to custom metadata, alt text for images is not an out-of-the-box feature in most headless CMS, and this means it’ll have to be implemented by your CMS provider.
For a headless CMS that doesn’t have a built-in Alt Text feature, we can manually add the alt text per image without much effort, as you only need to add an <alt> attribute to your images.
<img src="image.png" alt="our alt text">
Metadata
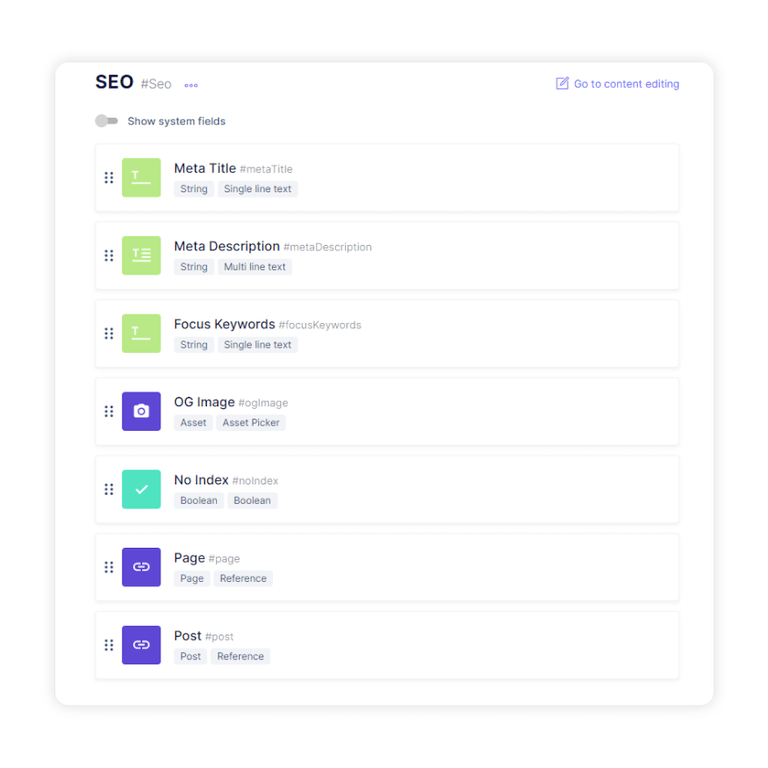
Metadata tags are special tags that Google Search understands. These tags describe the content of your site and help control how your pages appear in Google Search. And contrary to a traditional CMS, a headless CMS usually does not come with the ability to edit metadata tags on the fly, which means that your page’s title, descriptions, and other meta tags have to be manually added into your content models.
For example, for a headless website that has a React-based frontend but without support for custom metadata, we use react-helmet to conveniently add metadata into our <head>.
For a headless CMS that supports custom metadata, typically you’ll need to add fields containing custom metadata tags into your content model or to create a custom SEO model in which contains all the necessary meta tags. The created SEO model should be configured to have relations to all the pages that need it.
Structured data snippets
Structured data snippets help Google Search better understand your page and all the content within it. By providing valid structured data snippets, your site is eligible for rich results.
To create a structured data snippet, we use a JSON-LD array which is stored in the <head> of your site. And unlike the traditional CMS where the whole process is automated with a plugin (e.g., Yoast SEO), in a headless CMS, you’ll have to:
- Choose the correct structured data types for your pages
- Add custom JavaScript code which helps generate either all of the needed structured data or add more information to the server-side rendered structured data
 fetch('https://api.example.com/recipes/123')
.then(response => response.text())
.then(structuredDataText => {
  const script = document.createElement('script');
  script.setAttribute('type', 'application/ld+json');
  script.textContent = structuredDataText;
  document.head.appendChild(script);
});- Test your implementation using Rich Results Test
Pageview tracking issues
If you’ve ever tried to implement Google Analytics on a headless website, you’d probably noticed that only the first pageview of your website is tracked. This is largely due to the fact that the frontend of a headless CMS is a Single Page Application in nature, which means that the page loads only once and only one pageView event is triggered per session. To circumvent this issue, we implement History API to enable virtual pageviews which can then be tracked by using History Change trigger in Google Tag Manager.

History change trigger tracks for changes in URL fragment or in history state object. When a change occurs between these two, we have the following variables:
- History old URL fragment: What the URL fragment used to be.
- History new URL fragment: What the URL fragment is now.
- History old state: The old history state object, controlled by the site’s calls to pushState.
- History new state: The new history state object, controlled by the site’s calls to pushState.
To create a history change trigger, simply go to Google Tag Manager and:
- Choose Triggers > New
- Choose Trigger Configuration > History Change
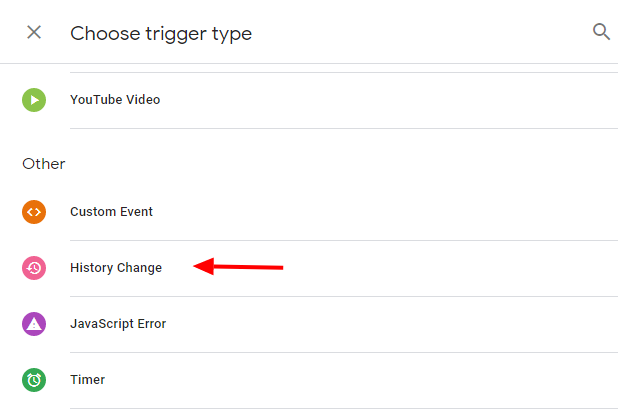
After this, we’ll need to create a new Google Analytics Configuration tag to fire on the History Change trigger we’ve just created, like so:
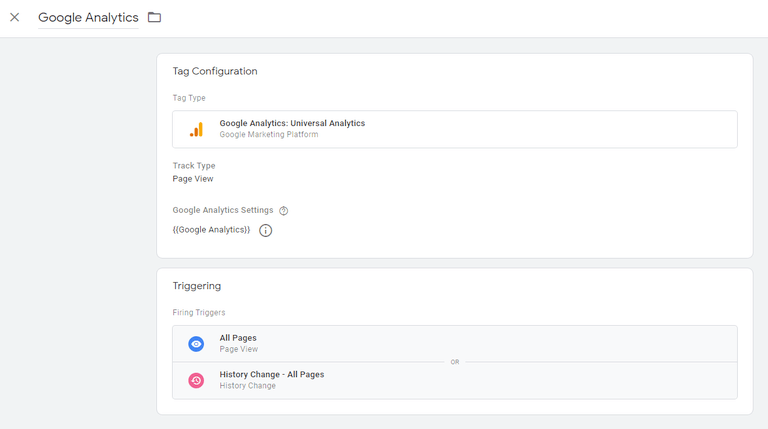
And that’s it. You should now be able to track pageviews in your headless website.
SEO audit issues
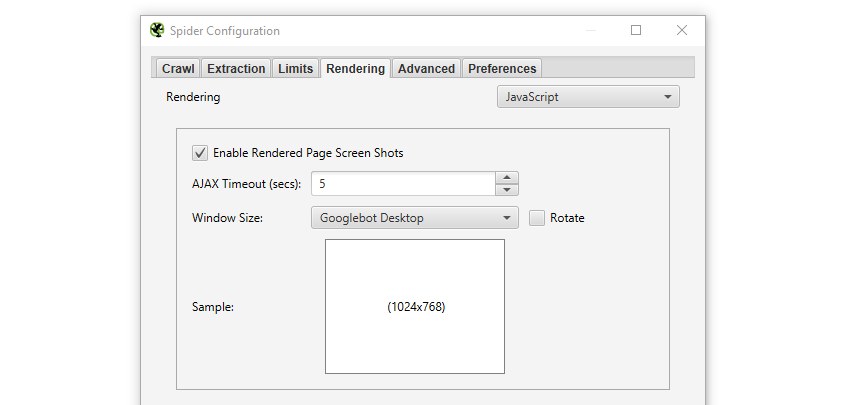
Since your headless website is mostly made of client-side JavaScript, SEO auditing it might pose to be a problem since the crawlers used in most free SEO auditing tools don’t come with the ability to render JavaScript.

This issue can, expectedly, be solved by paying more, as you can upgrade to the next premium plan to enable support for this feature. You should also note that JavaScript rendering is not enabled by default in most SEO audit tools, which means that you’ll have to manually enable it to crawl your headless website.
Code splitting
Since a typical headless CMS is heavily JavaScript-based, the amount of JavaScript code used in your website—especially when you use a large number of third-party libraries—can get to the point of overwhelming.
And as we all know, page speed affects SEO, so we can’t have our JavaScript code stay this way, which is why code splitting is made to circumvent this issue. With code splitting, you can split your JS code into smaller bundles which can then be dynamically loaded at runtime. This feature is currently supported by bundlers such as Webpack and Browserify via factor-bundle.
import React, { Suspense, lazy } from 'react';
import { BrowserRouter as Router, Route, Switch } from 'react-router-dom';

const Home = lazy(() => import('./routes/Home'));
const About = lazy(() => import('./routes/About'));

const App = () => (
  <Router>
    <Suspense fallback={<div>Loading...</div>}>
      <Switch>
        <Route exact path="/" component={Home}/>
        <Route path="/about" component={About}/>
      </Switch>
    </Suspense>
  </Router>
);
Dynamic rendering
As the majority of headless websites are JavaScript in nature, they face the same major SEO challenge that is JavaScript rendering.
[…], it’s difficult to process JavaScript and not all search engine crawlers are able to process it successfully or immediately.
Implementing Dynamic Rendering, Google
Crawlers can’t render JavaScript effectively, hence why Google themselves suggests Dynamic Rendering as a workaround solution in the meantime. Introduced in Google I/O ‘18, dynamic rendering is an ideal solution for JavaScript-based websites that want an easy way to solve the SEO challenges while still retaining all the benefits that come with client-side rendering. With this new rendering method, your web server sends normal, client-side-rendered content to the users, while search engine crawlers get fully server-rendered, static HTML content.
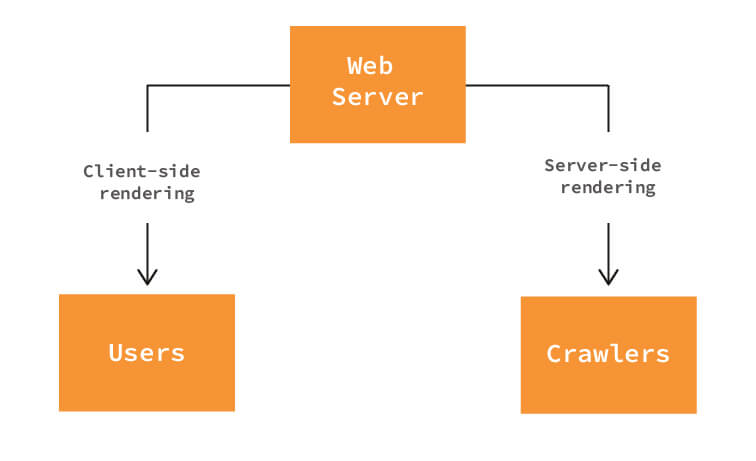
What all this means is that you get the best of both worlds with dynamic rendering—the ease of crawlability of server-side rendering and the fast subsequent rendering of client-side rendering.
To implement dynamic rendering, we’re going to have to rely on dynamic renderers such as Rendertron or Puppeteer to shorten the whole process. These renders will convert your site’s content into static HTML understandable by the crawlers.
After finished installing and configuring your dynamic renderer, follow the additional steps in Google’s official doc to configure the behaviors of user agents.
Conclusion
SEO for a headless CMS is not the most straightforward way, and it will require a bit of work from your developers to get everything right. But once you get the hang of it, a headless CMS can be just as effective as a traditional CMS when it comes to SEO. And what’s more is that you get much more freedom and flexibility to create content the way you want.


